Employment and Training Data Validation for WIA Title 1B, Wagner-Peyser, and TAA Programs
Employment and Training Data Validation Requirement
EDRVS_Manual_June 2012_WIA_LX
Employment and Training Data Validation for WIA Title 1B, Wagner-Peyser, and TAA Programs
OMB: 1205-0448
![]()
E-DRVS User Manual


Contents
3 Browser Requirements and Settings 5
4.1 Work Investment Act (WIA) 6
6.1 News and Calendar Events 6
6.3 Manage the Data Elements 8
7.1.1 Status Messages under the Upload Menu 11
9.2 Annual Report Facsimile 17
11 WIA Data Element Validation 20
11.6 Summary/Analytical Report 22
12.1.2 Status Messages under the Upload Menu 23
12.2.2 Status Messages under the Upload Menu 27
12.5 LX Data Element Validation 31
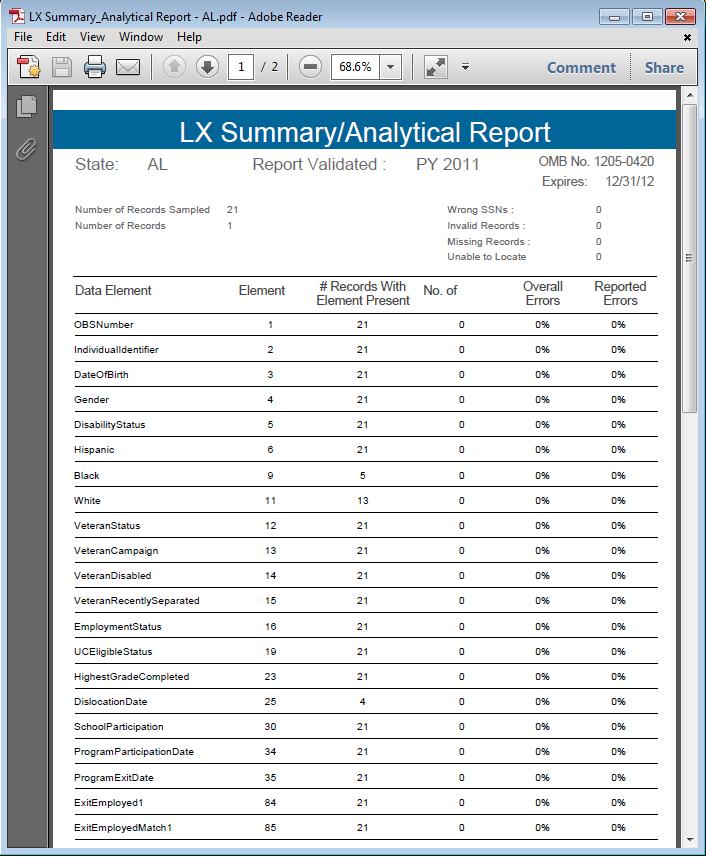
12.5.6 Summary/Analytical Report 33
The new Enterprise Data Reporting and Validation System (E-DRVS) website serves as a conduit for states to upload and validate program records, data, and reports quarterly and annually. The information generated by the reports allows ETA to track the achievement of the WIA and LX programs at local and national levels.
ETA requires each state to authenticate their data through report validation and data element validation. State calculations are verified through Report validation, whereas Data Element Validation verifies the data used to conduct state calculations. Validation allows states to compare their reported values to the calculations of E-DRVS. All states must validate their information after each quarterly upload. Validation guarantees that ETA has the most accurate, current information to reference for program policy and funding decisions.
All states have the guidelines for completing the forms ETA 9090, ETA 9091, ETS 9002 A-E and VETS 200 A-C. Reports contain information from ETS 9002 A-E and VETS 200 A-C contain job seeker characteristics, services and records of work applications and job orders.
States are expected to maintain data validation and documentation for a period of three years after the date of completion. States are permitted to devise and establish their own methods of record retention and archival.
Reporting Measures
Quarterly reports are due no later than forty-five days after the completion of each quarter. If the Report Due Date should fall on a weekend, the report due date automatically defaults to the Friday before the weekend.
This guide was developed to help facilitate data uploads and verifications through the E-DRVS site. This guide will also show users how to retrieve data, approve submissions and navigate the site interface. The guide is divided into the chapters listed below:
Program Overview
Guide Structure
Browser Requirements and Settings
Supported Forms
Accessing the System
Admin
WIA Upload
Enter Report Values
WIA Performance Reports
WIA Report Validation
WIA Data Element Validation
LX
The E-DRVS system is a web-based application that operates in Windows Internet Explorer and Mozilla Firefox browsers. Internet Explorer must be version 8.0 or higher. Firefox must be version 11.0 or higher. The E-DRVS application does not support Google Chrome or Safari browsers at this time.
T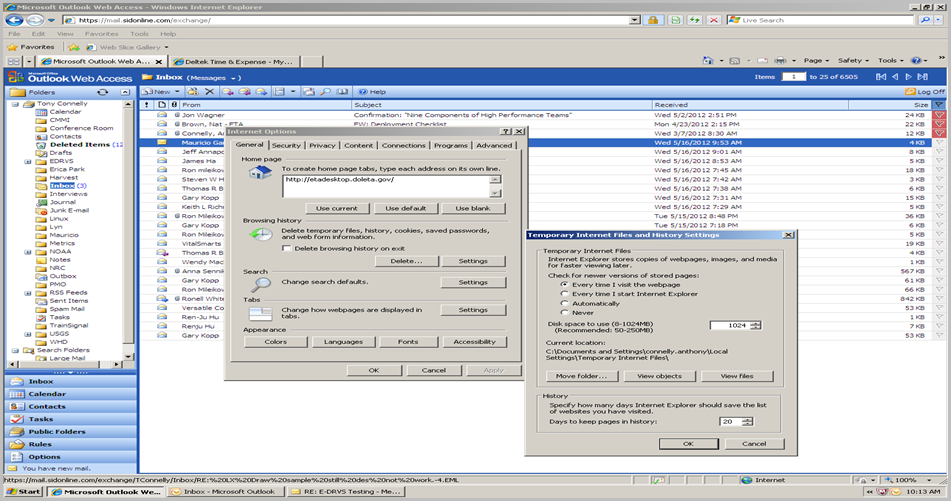 o
ensure the E-DRVS system performs optimally, adjust the browser
settings for the computer. Under Internet Options, choose Browser
History. From the Browser History menu, users should have the option
to adjust the frequency of how often the computer “Checks for
newer versions of stored Pages.” Select the first option,
“Every time I visit the Web Page” radio button and then
Click Ok, at the bottom of the pop up box.
o
ensure the E-DRVS system performs optimally, adjust the browser
settings for the computer. Under Internet Options, choose Browser
History. From the Browser History menu, users should have the option
to adjust the frequency of how often the computer “Checks for
newer versions of stored Pages.” Select the first option,
“Every time I visit the Web Page” radio button and then
Click Ok, at the bottom of the pop up box.
ETA 9090- Quarterly Report
ETA 9091-Annual Report
ETA 9002 A Quarterly Report-Services to Participants
ETA 9002 B Quarterly Report-Services to Veterans, Eligible Persons and TSMs
ETA 9002 C Quarterly Report-Performance Outcomes-Exiters
ETA 9002 D Quarterly Report- Performance Outcomes-Veterans, Eligible Person and TSMs
ETA 9002 E Quarterly Report- Job Openings Received
VETS 200 (A) -DVOP Quarterly Report
VETS 200 (B) -LVER Quarterly Report
VETS 200 (C) -DVOP/LVER Quarterly Report
All program users should be able to access the E-DRVS application via the Department of Labor’s EBSS website. Once users Log in to EBSS, there will be a link to jump to E-DRVS based on the assigned role for the User. They may view, access, and modify program information for the state.
The Admin menu allows Program Administrators to modify or add site news and calendar events. The administration menu will not be available to Internal Users or External Users.
To add Program News, select the program name from the drop down menu.
Create a title for the news and add the accepted News Id.
Complete the News date with the (MM/DD/YYYY)
Next, paste News Text into the box with the scroll bar. The box with the News Text supports articles with up 2000 characters.
To review the article, click on the Preview button to the right of the screen. A pop up box will appear with the content from the News Text box.
To modify the text, return to the original screen to make adjustments. If the text is correct, continue to the next field in order to add the News Activation date.
Select an expiration date for the article. Once both of these fields are completed, preview the article once more to ensure the accuracy of all data.
Check the Approve box.
After the article content has been approved, click on the Add button to publish the article on the E-DRVS Home Page.
If Cancel is selected, all fields previously filled will be deleted. E-DRVS will not save drafts of articles. Articles must be published to save the information in the system.

Under the Admin menu, users have the option to extend the due date for the quarter. First, choose either the WIA or LX system. Click on the drop down menu to pick the quarter to extend then click the select button. Next, click the calendar icon to choose an extension date. After all fields have been completed, select update. The system will display a message notifying the user that the due date was changed successfully.


To edit the descriptions of the Data Elements, select Manage Data Elements from the Admin menu. First, choose either the WIA or LX system from the drop down menu and select View. A table with the Data Elements Id Number, Column Name, Display Name and Description will appear below. The Data ID numbers appear as blue hyperlinks on the left side of the page.


From the table, click on the blue numeric ID of the description. The numeric hyperlink will bring up the Edit Data Element Description page. Modify the description and select Update to upload your changes to the Data Elements page.
From this menu, users will be able to Upload Files, review the Processing Status of Uploads, Edit Check errors within the files, address Duplicates errors, and approve the Submission. If the user is logged on as an Internal Admin or an Internal User, the tab will only present three options: review the Processing Status of Uploads, Edit Check errors within the files, and address Duplicates.


To upload program files, click on the WIA Upload Menu.
Select the program type from the drop down menu.
The State box should automatically default to the name of the state entered at the time of Log In. If the correct state does not appear, use the drop down list to select the appropriate state. External Users will not have the option to change states from this screen.
Choose the Program Year for the report.
Select the Quarter the report was completed.
Select the appropriate report to upload from the documents folder.
Uploading times will vary based upon the size of the file. The system scans several hundred fields for errors. When a file uploads successfully, the system automatically does a search for errors and completes an Edit Check. Users may access a detailed Edit Check from this screen. Or, users may navigate back to the WIA Uploads tab and select Edit Check from the menu.
Larger files will require a longer period of time to process the data. Users may log off during the upload and return later to review the status. Upon returning to the site, users may check the status of the upload by opening the WIA Upload menu and selecting Processing Status from the sub-menu.


Improper File Format
If a user accidentally uploads an unsupported file format, the system will display a message that, “The file format selected is not supported. Please upload a file with one of the following extensions: .dat, .txt, .csv, or .zip (zip file of .dat, .txt or .csv)!” Upon receiving this message, the user should convert the file into an acceptable format and then upload the file again.
Expired Quarter
If a user attempts to upload a file after the allotted period for that quarter, the status message “The selected upload quarter due date has been expired, it cannot be uploaded anymore” will appear. Users are expected to upload files within forty-five days of the end of the quarter. To upload after the deadline has passed, an Admin must request a due date extension for that quarter.
Previous Approval
If the user receives the message that, “The selected upload quarter has been Approved, it cannot be uploaded anymore,” the user should then cease uploading for that particular quarter. This status message alerts the user that the information for that quarter is already in the system and it has been approved. In this case, users should ensure they have selected the proper quarter.
Over the Size Limit
All uploaded files must be 200MB or less. If an uploaded file is in excess of 200 MB, the system will display the message “The file you are attempting to upload is in excess of 200MB. Please 'ZIP' the file and attempt the upload again.” If the user receives this message, return to the file and zip it to compress the contents. Then return to the upload page to load the newly compressed document.
Processing times will vary based on the size of the file. If the upload is taking a while to complete, users may check the Processing Status to receive an update for the file processing.
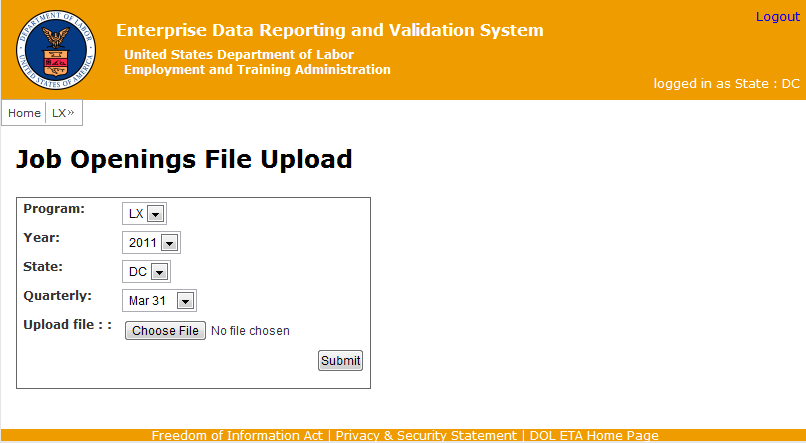
Select the Program Type from the drop down box.
Pick the State, the Program Year of the Report and the month of the Quarter end.
After all fields have been completed, click the submit button.


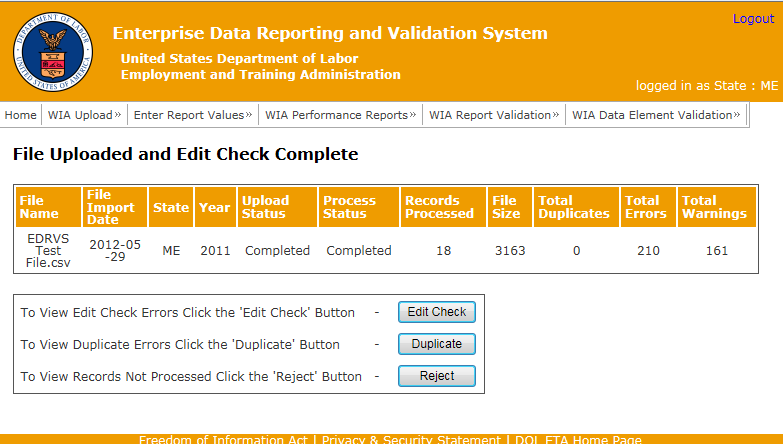
After the request has been processed, the box above will appear on the screen. This box contains several fields. If the file is still being scanned, under Upload Status it will display the word” Processing” instead of “Completed”. If the Total Errors field has any number of errors, the user must correct the errors once the report has been successfully uploaded. Files may not be approved unless the Total Errors field is equal to zero. However, files with Warnings may be approved.
Before an upload may be approved for submission, the file must be reviewed for errors. Not all reports will contain errors. If the report does not have any errors, proceed to the Submission Approval function. However, if the report does contain errors, the screen will display the option to View Warnings and Errors under the Processing Status.
Users may also click on the Edit Check Errors to see the detailed results. From the Edit Check Errors Menu, users can scroll through detailed notes about Warnings and Errors in the reports. Results can also be sorted by the OBS Number. All result charts can be exported to CSV or to XML to be examined and corrected.


To locate duplicate errors in the files, select the Program Type. The State field will be pre-populated with the state used to Log on to the system. Choose the Program Year from the drop down menu and Select the Quarter. After completing the four fields, press the submit button. If duplicate errors do not exist within the file, the system will display the message “Nothing found to display.” If the system discovers duplicate errors within the submission, the user must review the duplicate report to find and remove all errors.


Users may also address duplicate errors through a separate page that will appear after the file has been uploaded. Once the user uploads a WIA file to be processed and checked for errors, the user can view a detailed report to Edit Check Errors or view Duplicate Errors. Or, users can view unprocessed records by selecting the Reject button.
From this menu, External Users can approve the submissions for their state.


Submissions with errors may not be approved. The user must reject the file and proceed to the Edit Check screen to resolve all errors within the document. However, if the Error Status only contains warnings and the errors are equal to zero, the user may proceed with the submission.
In order to proceed to the Certification Page, users must first approve the submission for that quarter.
Users may enter report values to update tables A-N. However, Report Values are pre-populated with program data from the files uploaded under the WIA Upload tab. Within these tables, users may modify incorrect values.


To view the Quarterly Report Facsimile, users must first select their state. Next, use the drop down box to choose a Program Year. Choose the Quarter to be reviewed and then press the View button. The Quarterly Report will appear below the drop down boxes. From the results screen, users have the option to export the file to a .PDF or to an Excel Spreadsheet (XLS).


To view the Annual Report Facsimile, users must first select their state. Next, use the drop down box to choose a Program Year and then press the View button. The Annual Report will appear below the drop down boxes. From the results screen, users have the option to export the file to a .PDF or to an Excel Spreadsheet (XLS).
Users may validate their reports after first Approving the Submission (Section 7.5). If the report has not been approved first, the system will display the message, “There is no Report for the selected Quarter.” Below that message, the system will display a reminder with an asterisk to approve the submitted file from the “Approve Submission page”. If this message is displayed on the screen, return to the Approve Submission page. Ensure that the file has been uploaded and approved. Then, return to the Certification page to validate the report for the selected quarter.


Users will see three status messages. In the screen shot above the status message is “Saved and Not Validated.” This message means that an external user needs to accept the Report by scrolling to the bottom of the page and entering an acceptable PIN. To fully accept and validate the report, the user must enter their Personal Identification Number (PIN). PINS may only contain six characters. The file may be published as a .PDF or an Excel file.
Users may also see the status message “Approved by ETA.” This message signifies that the report has been approved by the state and accepted by ETA.


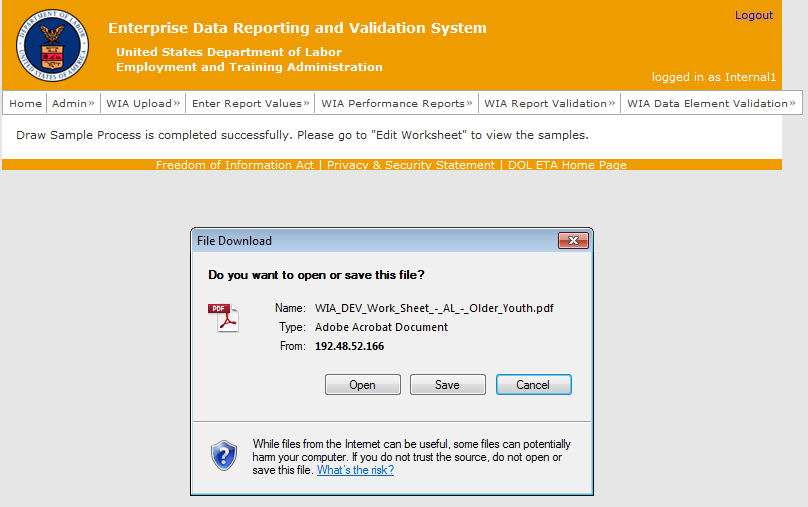
To enable this function, go to the WIA Report Validation menu and click the sub-folder entitled “Draw Sample”. After being directed to this page, there are three ways to draw a basic sample: Record, WIB, and Office. Select the sample type and then click the ‘Draw Sample’ button. Once the Sample process has completed, proceed to the “Edit Worksheet” subfolder.


To edit the worksheet go to “Edit Worksheet” under the WIA report Validation function in the navigation bar. Once the page opens, go to the drop down menu to the left of the Funding Stream. Select the type of worksheet and then click view. A .PDF file will open in a separate window with the data from the drawing sample.

To print the worksheet, select the appropriate funding stream from the drop down box. Click Print. The Worksheet will be sent to the default printer. In the event no default printer has been selected for a particular computer, pressing print will automatically convert the file to a .PDF file.
After Drawing a Sample from the Record, WIB, or Office pools, users may separate and view the results by the funding stream. To do so, select Sample Reports from the WIA Data Element Validation Menu and choose the funding stream from the sub-menu. After the funding stream has been selected the sample report will appear onscreen.
However, if no sample was drawn before selecting Sample Report, the system will prompt the user to “Draw a Sample” before proceeding with this step.
After Drawing a Sample, users may access a Summary/Analytical report to view itemized data uploaded. Select the Funding Stream for the Summary/Analytical report. Once the funding stream has been selected, the report will pop up in another window. The summary allows users to review the number of errors, verify the number of records processed, and check element data for that particular funding stream.


1) Select the program type from the drop down menu.
2) The State box should automatically default to the state entered at the time of Log In. If the correct state does not appear, use the drop down list to select the appropriate state.
3) Choose the Program Year for the report.
4) Select the Quarter the report was completed.
5) Select the appropriate report to upload from the documents folder or an external storage device.
Uploading times will vary based upon the size of the file. The system scans several hundred fields for errors. When a file uploads successfully, the system automatically does a search for errors and completes an Edit Check. Users may access a detailed Edit Check from this screen. Or, users may navigate back to the LX Uploads tab and select Edit Check from the menu.
Larger files will require a longer period of time to process the data. Users may log off during the upload and return later to review the status. Upon returning to the site, users may check the status of the upload by opening the LX menu, selecting Job Seekers, and selecting Processing Status from the sub-menu.
Improper File Format
If a user accidentally uploads an unsupported file format, the system will display a message that, “The file format selected is not supported. Please upload a file with one of the following extensions: .dat, .txt, .csv, or .zip (zip file of .dat, .txt or .csv)!” Upon receiving this message, the user should convert the file into an acceptable format and then upload the file again.
Expired Quarter
If a user attempts to upload a file after the allotted period for that quarter, the status message “The selected upload quarter due date has been expired, it cannot be uploaded anymore” will appear. Users are expected to upload files within forty-five days of the end of the quarter. To upload after the deadline has passed, an Admin must request a due date extension for that quarter.
Previous Approval
If the user receives the message that, “The selected upload quarter has been Approved, it cannot be uploaded anymore,” the user should then cease uploading for that particular quarter. This status message alerts the user that the information for that quarter is already in the system and it has been approved. In this case, users should ensure they have selected the proper quarter.
Over the Size Limit
All uploaded files must be 200MB or less. If a file is uploaded in excess of 200 MB, the system will display the message “The file you are attempting to upload is in excess of 200MB. Please 'ZIP' the file and attempt the upload again.” If the user receives this message, return to the file and zip it to compress the contents. Then return to the upload page to load the newly compressed document.
Select the Program Type from the drop down box.
Pick the State, the Program Year of the Report and the month of the Quarter end.
After all fields have been completed, click the submit button.
After submitting the request, a status box will appear with pre-populated data about the file.
Before an upload may be approved for submission, the file must be reviewed for errors. Not all reports will contain errors. If the report does not have any errors, proceed to the Submission Approval function. However, if the report does contain errors, the screen will display the option to View Warnings and Errors under the Processing Status. Users may also click on the Edit Check Errors to see the detailed results. From the Edit Check Errors Menu, users can scroll through detailed notes about Warnings and Errors in the reports. Results can also be sorted by the OBS Number. All result charts can be exported to CSV or to an XML to be examined and corrected.


To locate duplicate errors in the files, select the Program Type. The State field will be pre-populated with the state used to Log on to the system. Choose the Program Year from the drop down menu and Select the Quarter. After completing the four fields, press the submit button. If duplicate errors do not exist within the file, the system will display the message “Nothing found to display.” If the system discovers duplicate errors within the submission, the user must review the duplicate report to find and remove all errors.


If the file contains errors, two boxes will appear on the Approve Submission page. One box will contain all file information such as the File Name, the date the file was imported, the Upload Status, Progress Status, the number of records processed, and the file size. A second box with red headers will appear to show the total number of errors and warnings. Submissions with errors may not be approved. The user must reject the file and proceed to the Edit Check screen to resolve all errors within the document. However, if the Error Status only contains warnings and the errors are equal to zero, the user may proceed with the submission.
Submissions with errors may not be approved. The user must reject the file and proceed to the Edit Check screen to resolve all errors within the document. However, if the Error Status only contains warnings and the errors are equal to zero, the user may proceed with the submission.
Select the program type from the drop down menu.
The State box should automatically default to the state entered at the time of Log In. If the correct state does not appear, use the drop down list to select the appropriate state.
Choose the Program Year for the report.
Select the Quarter the report was completed.
Select the appropriate report to upload from the documents folder or external storage device.
Uploading times will vary based upon the size of the file. The system scans several hundred fields for errors. When a file uploads successfully, the system automatically does a search for errors and completes an Edit Check. Users may access a detailed Edit Check from this screen. Or, users may navigate back to the LX Uploads tab and select Edit Check from the menu.
Larger files will require a longer period of time to process the data. Users may log off during the upload and return later to review the status. Upon returning to the site, users may check the status of the upload by clicking the LX menu, selecting Job Openings, and selecting Processing Status.
Improper File Format
If a user accidentally uploads an unsupported file format, the system will display a message that, “The file format selected is not supported. Please upload a file with one of the following extensions: .dat, .txt, .csv, or .zip (zip file of .dat, .txt or .csv)!” Upon receiving this message, the user should convert the file into an acceptable format and then upload the file again.
Expired Quarter
If a user attempts to upload a file after the allotted period for that quarter, the status message “The selected upload quarter due date has been expired, it cannot be uploaded anymore” will appear. Users are expected to upload files within forty-five days of the end of the quarter. To upload after the deadline has passed, an Admin must request a due date extension for that quarter.
Previous Approval
If the user receives the message that, “The selected upload quarter has been Approved, it cannot be uploaded anymore,” the user should then cease uploading for that particular quarter. This status message alerts the user that the information for that quarter is already in the system and it has been approved. In this case, users should ensure they have selected the proper quarter.
Over the Size Limit
All uploaded files must be 200MB or less. If a file is uploaded in excess of 200 MB, the system will display the message “The file you are attempting to upload is in excess of 200MB. Please 'ZIP' the file and attempt the upload again.” If the user receives this message, return to the file and zip it to compress the contents. Then return to the upload page to load the newly compressed document.
To review the processing status for file uploads users must:
Select the Program Type from the drop down box.
Pick the State, the Program Year of the Report and the month of the Quarter end.
After all fields have been completed, click the submit button.
Before an upload may be approved for submission, the file must be reviewed for errors. Not all reports will contain errors. If the report does not have any errors, proceed to the Submission Approval function. However, if the report does contain errors, the screen will display the option to View Warnings and Errors under the Processing Status. Users may also click on the Edit Check Errors to see the detailed results. From the Edit Check Errors Menu, users can scroll through detailed notes about Warnings and Errors in the reports. Results can also be sorted by the OBS Number. All result charts can be exported to CSV or to an XML to be examined and corrected.
If the file contains errors, two boxes will appear on the Approve Submission page. One box will contain all file information such as the File Name, the date the file was imported, the Upload Status, Progress Status, the number of records processed, and the file size. A second box with red headers will appear to show the total number of errors and warnings. Submissions with errors may not be approved. The user must reject the file and proceed to the Edit Check screen to resolve all errors within the document. However, if the Error Status only contains warnings and the errors are equal to zero, the user may proceed with the submission.
To view the performance outcomes for
9002 A Facsimile
9002 B Facsimile
9002 C Facsimile
9002 D Facsimile
9002 E Facsimile
9002 F Facsimile
9002 EUC Facsimile
VETS A Report Facsimile
VETS B Report Facsimile
VETS C Report Facsimile
Certification Page
The LX Report Validation tables allow users to view the summaries for each performance outcome group. From the menu, users should select the report they wish to view and then from this menu, users may view Report Validation for:
View 9002 A
View 9002 B
View 9002 C
View 9002 D
View 9002 E
View 9002 F
View 9002 EUC
View VETS A Report
View VETS B Report
View VETS C Report


To enable this function, go to the LX Report Validation menu and click the sub-folder entitled “Draw Sample”. After being directed to this page, there are three ways to draw a basic sample: Record, WIB, and Office. Select the sample type and then click the ‘Draw Sample’ button. Once the Sample process has completed, proceed to the “Edit Worksheet” subfolder.
To edit the worksheet go to “Edit Worksheet” under the LX Report Validation function in the navigation bar. Once the page opens, go to the drop down menu to the left of the Funding Stream. Select the type of worksheet and then click view. A .pdf file will open in a separate window with the data from the drawing sample.


Worksheets may be exported in an XML format or as an Excel file for editing. Users must select the same Funding Stream used to edit the worksheet. If a different funding stream is selected, a blank or empty file will appear in a pop up window. If this occurs, close the window and return to the Export Worksheet page on the LX Data Element Validation menu and select the proper Funding Stream.
To print the worksheet, select the appropriate funding stream from the drop down box. Click Print. The Worksheet will be sent to the default printer. In the event no default printer has been selected for a particular computer, pressing print will automatically convert the file to a .PDF file.
Sample reports After Drawing a Sample from the Record, WIB, or Office pools, users may separate and view the results by the funding stream. To do so, select Sample Reports from the LX Data Element Validation Menu and choose the funding stream from the sub-menu. After the funding stream has been selected, the sample report will appear onscreen.
However, if no sample was drawn before selecting Sample Report, the system will prompt the user to Draw a Sample before proceeding with this step.
After Drawing a Sample, users may access a Summary/Analytical report to view itemized data uploaded. The report will allow users to review the number of errors, verify the number of records processed, and check element data for that particular funding stream.

Enterprise Data Reporting
and Validation System Page
|
| File Type | application/vnd.openxmlformats-officedocument.wordprocessingml.document |
| Author | Arianne Erica |
| File Modified | 0000-00-00 |
| File Created | 2021-01-28 |
© 2025 OMB.report | Privacy Policy